Accessible with bit.ly/frozen-soft and thanks for visiting | Please don't skip onto the direct link, whereupon use the ADF.LY/J.GS links, that really helps and means a lot to me | If you're using Chrome Browser, you can type frozen-soft.blogspot.com then press SPACE to search


You're on: Tutorial
Showing posts with label Tutorial. Show all posts

Thursday, June 11, 2015

Tips on how to make your Windows 8/8.1 goes fast as Windows 7

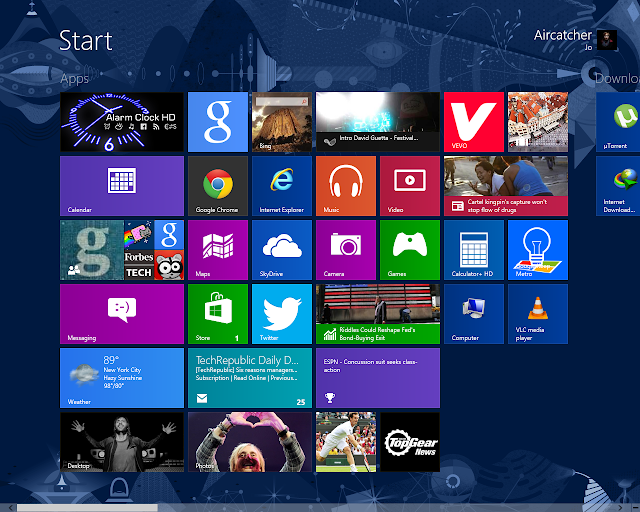
As you know that Windows 8 and 8.1 got a loathe of bad critics from many users that comes from Windows 7. There are lots of changes there, and the one that is really obvious is the start screen. In the earlier Windows, we can easily access programs and run a command easily from a smaller but faster start menu. But since then, Microsoft suddenly decided that Start Screen will be loved by many users, because they loved it (What kind of business strategy is this?). Hey Microsoft, you're not the only users there. Of course, not all users will love this significant change.

There are of course, a lot of another new stuffs in Windows 8/8.1 that you won't see on Windows 7. But all these changes just suddenly make a wonky performance.

And here, I'll now help you as Windows 8/8.1 users, to improve it further. There are includes disabling unnecessary eye candy effects such as shadows, animations, etc. Also you'll be able to disable unwanted programs and services which start automatically with Windows.
 

So, check out these nice tweaks:
REGISTRY TWEAKS  
Make sure you know what you're doing, backup your registry first before doing this. 
1. Copy this code to notepad and save it as [FILENAME].reg
2. Run [FILENAME].reg and confirm.
 
SHADOWS & ANIMATIONS
1. Press WIN+S and type sysdm.cpl, press Enter
       Choose Yes on UAC Prompt if any
2. Go to Advanced, and click Settings under Performance
3. Select Adjust for best performance if you don't want any animations. But you can choose Custom and select that suits to you.

DISABLING AUTOSTART SERVICES
1. Press WIN+S and type in services, select View local services.

2. Open these each items and select Startup Type to Disabled
  • Diagnostic Policy Service
  • Distributed Link Tracking Client
  • IP Helper
  • Program Compatibility Assistant Service
  • Portable Device Enumerator Service
  • Remote Registry
  • Secondary Logon
  • Security Center
  • TCP/IP NetBIOS Helper
  • Windows Error Reporting Service
  • Windows Image Acquisition (WIA)
DISABLE STARTUP PROGRAMS
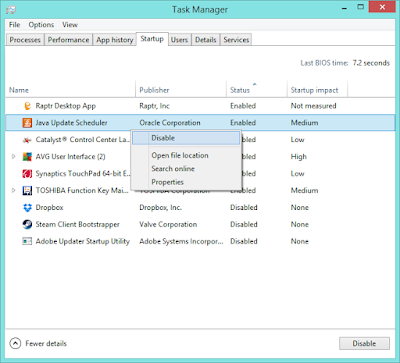
1. In Windows 8/8.1, startup options has been moved to the Task Manager, so open it by right-clicking taskbar and select Task Manager, or you can do it so by pressing and holding Ctrl+Shift+Esc 

2. Now at your Task Manager, select the program that you may rarely use, and click Disable button, or you can do it so by right-clicking the program and select Disable
Note that you can re-enable the disabled program again vice versa

REBUILD INDEX SETTINGS
From time to time, your Windows 8/8.1 search charm will feels sluggish and slower than before as if you use it very often. And I just found this problem on which Windows 8/8.1 have a different indexing system compared to the previous Windows. Rebuilding the index can temporarily solves the problem.

1. Now press WIN+S 
(If your search charm feels very very slow, you may want to press WIN+C > Settings > Control Panel. In the Control Panel Window, type in index in the search box and click Indexing Options)
2. "Indexing Options" Window will appear, and now click Advanced
3. In the Troubleshooting section, press Rebuild and click OK

Don't worry this is just to rebuild the index settings, it may take some time, but you can close the window while the process is still running. Click OK then click Close
 
UPDATE ONLY WHAT YOU NEED
Windows Update will tell you that Automatic Update is really important, but the fact is, is not 100% important at all. After your Windows had finished the installation, suddenly your Windows feels sluggish and a bit slowing down. And that is what happens to me.
In many case, it is better to choose the third option from the picture above "Check for updates but let me choose whether to download and install them". And the next step, you need to install the latest version of Secunia PSI, and it is fully free (Check out this beautiful software).
With this, you can check everything about the updates, but only the thing that is critical for your Windows.
And what you see from above, is Secunia PSI 2.0, but what is the main difference with the version 3.0?
From the looks, it is absolutely different, such as dashboard & scan results, but 2.0 is really a good tool for those who wants to keep in track with the details of the updates available for your computer.
In 3.0, indeed you can see the available updates, just like in 2.0, but you can't do it manually. Well, it all depends on your choice though.
Secunia PSI 2.0                           Secunia PSI 3.0
PSI 2.0     PSI 3.0

ADDITIONAL TIPS
  • Install only necessary software, don't force it to take too many software installed. (And surely to install the original version, patch or crack is mostly the answer on why your Windows is slowing down)
  • Use a good antivirus and keep it updated (Remember, original version)
  • (Check out this post)
  • Use a virtual machine to test any kind of suspicious software.
  • You can install Operating Systems as many as you want, but it is recommended to install no more than 3 OSes. Be sure that if you really use all of them, everytime.

Posted By Unknown 6/11/2015

Wednesday, January 14, 2015

Colorful Windows 8 Wallpaper Theme Pack

Want a windows 8 sleek and minimalist wallpaper style but didn't know where to find at, well you are now in the right page.

I'd like to remind you, that these wallpaper packs are made from only one wallpaper from YouTube user (I'd forgot that) with the link provided and re-edited with photoshop

Nah, no need to wait longer. Wallpapers included:
 

[DROPBOX - 435 KB]
 http://adf.ly/wEotA


Or if you prefer Windows 7/8/8.1/10 Theme Pack file, here it is
WINDOWS 7
[DROPBOX - 231.77 KB]
http://adf.ly/wEpOB

WINDOWS 8/8.1/10
[DROPBOX - 231.77 KB] 
 http://adf.ly/wEpFN

Posted By Unknown 1/14/2015

Friday, September 27, 2013

Google's Doodle: 15th Birthday Hacks

Google is now 15 and they announce it with their new doodle, "Piñata Doodle" and somehow there's the secret how to get the unlimited score of the game.

2. Click the Play button on the cake in the Google doodle

3. Right click anywhere on the doodle and select "Inspect Element"

4. Click on the "Sources" tab

5. Click the small arrow on the left hand side of the inspector window (just below the X)

6. Click the arrow next to "logos/2013/bday13"

7. Click "bday13.js"

8. Click the "{ }" button at the bottom of the window, next to the line and column number

9. Scroll down to line 1744 and click on the number 1744 on the left hand side of the window

10. Click in the doodle to hit the pinata
(you'll notice that the animation will freeze and line 1744 will be highlighted)

11. On the right hand side of the window (under "Watch Expressions"), locate the word "Closure" and click the arrow next to it

12. Scroll down until you find the letter "S"

13. Double click the number next to "S" and change it to something big (100 for example)

14. Press the play button

HINT! In step 12, if you want to change the number of lives you have, find the letters "bd" and change the number next to it to the number of lives you want

Thanks to user Robert Bressi to make the video: Click Here for the Video

Posted By Unknown 9/27/2013

Sunday, August 11, 2013

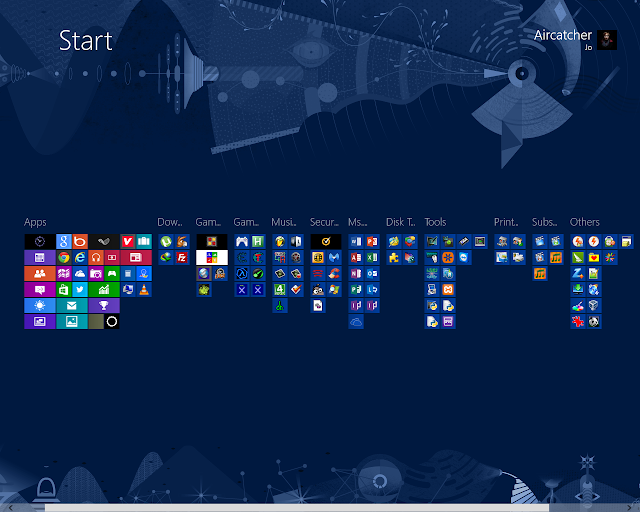
Windows 8 StartScreen Style for Chrome's New Tab

Ever you think about enjoying Windows 8's Start Screen in your Google Chrome? Well here's what it's look like

How? Well, you can install this free Extension from dev.frabarz.clLINK

REVIEW (new MetroTab)
Customizable new tab page with Metro UI
new metroTab is an extension that replaces the new tab page with a more customizable version, with Metro interface

Also, includes some tiles that can retrieve information from their page and show it to the user in the same page

To add a tile, customize the look of the page or change the options (like the weather location), put the cursor over the avatar in the upper right corner and select the option on the menu

Any suggestions of new features or special icons, as well as notices of errors and failures are welcome

Posted By Unknown 8/11/2013

Saturday, August 10, 2013

Aero Patch 1.4

Aero Patch 1.4 enables full featured aero glass and personalization features in Windows 7 Home Basic and Windows 7 Starter, such as
- Aero Glass and coloring.
- Full themes support including RSS and slideshow themes.
- Peak, Shake and WinFlip 3D.
- Third party themes support.

CHANGELOG
Aero Patch 1.4
"This copy of Windows is not genuine" fixed. Probably you'll never see it again.
Warning!Actually your Windows will be not genuine, but you will not receive notification messages. Aero Patch is still harmful for your OS, use it if you strongly sure what you need Aero.

Aero Patch 1.2
Added uninstaller. Go to Control Panel - Programs - Uninstall a program to completely remove Aero patch and rollback all changes.

Aero Patch 1.0

Initial release.

HOW TO INSTALL AERO PATCH
1. Uninstall the Personalization Panel and Personalization panel DWM controller software if they was installed. They are incompatible with Aero Patch

2. Unpack Aeropatch1.4.exe from downloaded zip archive. Right click on the extracted file and select "Run as administrator". Your Windows will be rebooted. Just wait when it will be done
Both x86 and x64 systems are supported


DOWNLOAD
Aero Patch 1.4

SOURCE: WinAero.com

Posted By Unknown 8/10/2013

Saturday, July 20, 2013

Make a complete "System" folder


In Windows 7 (also Windows 8), control panel are arranged in categories so it looks more simple, but in fact, it is makes more difficult. There's a way that can be a place that you can find every single system settings.

Here's how:
1. Make a new folder anywhere, example at the desktop
 

2. Rename the folder


Into ....


NOTE: You can rename the "NewFolder" into whatever you like. e.g. System.{ED7BA470-8E54-465E-825C-99712043E01C}

Posted By Unknown 7/20/2013

How to Backup / Restore Pinned Items on Start Screen in Windows 8

EXAMPLE


HOW TO BACKUP PINNED ITEMS
1. Download this file
    Backup-Pinned_Start_Items.bat
    Extract first
     

2. If prompted, click Run

3. You will now have a Start-Pinned-Items-Backup folder on your desktop that is the backup of your pinned taskbar items

4. Move this folder to where you like for safe keeping
NOTE: Do not rename this folder since it must remain the exact same name to be able to restore your pinned Start items with

HOW TO RESTORE PINNED ITEMS
1. If you have not already, make sure that any 3rd party programs that were pinned to your Start screen when the backup was created are still installed to the same location first

2. Move or copy the Start-Pinned-Items-Backup folder above to your desktop

3. Download this *.bat file
    Restore-Pinned_Start_Items.bat
     Extract First
     

4. If prompted, click Run

5. You will now notice your screen flicker as explorer is restarted

6. Your backed up pinned Start items have now been restored

Posted By Unknown 7/20/2013

Friday, July 5, 2013

Boot Ubuntu from CD

When installing or trying the LiveCD version of Ubuntu from a CD, your computer has to be able to boot from that CD. Usually this consists of just inserting the disk into your CD/DVD drive and rebooting your computer. Sometimes though this doesn't work, or just not as expected or planned. Here are some common problems and how to fix them.
CD/DVD BURNED IMPROPERLY
Check and make sure that the disk was burned properly. If you bought an original CD from a (web) store, then you should not have to worry about this section. If you have not yet downloaded the ISO Image, click here. If you have not yet burned the downloaded ISO image to a disk, then head on over to BurningIsoHowto for directions.

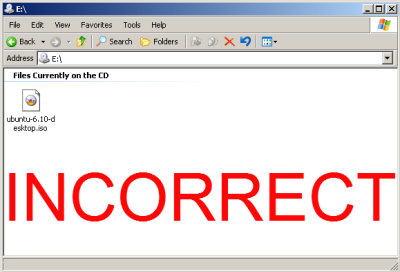
In your current operating system when you navigate the CD that you burned, you should see multiple directories and files, not the single .iso file. If you see just the single .iso file when browsing to the CD, it has been improperly burned and you will have to burn it again following the instructions at BurningIsoHowto.

1. Correct CD file display

2. Incorrect CD file display. You will have to burn it again following the following instructions at BurningIsoHowto
BIOS ISN’T SET TO BOOT FROM CD/DVD DRIVE
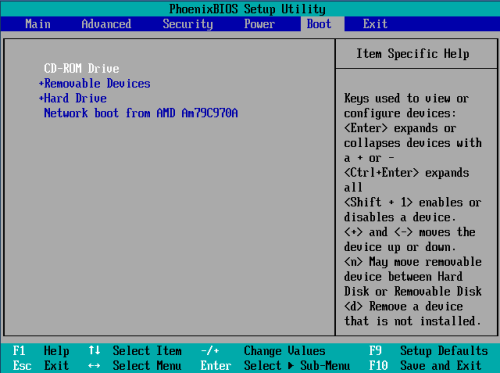
Some computers are set to boot directly from the hard drive. This should be as simple as entering the BIOS, enable booting from the CD-ROM drive, and making sure that the CD-ROM is before the hard drive in the boot order.
The most common way to enter the BIOS is to press the DELETE key when the computer is first booted (this seems to be becoming standard). On other systems it could be a different key, or combination of keys like ESC, F1, F2, F10, F12, Ctrl-Esc, Alt-Esc, Ctrl-Alt-Esc, Ctrl-Alt-Enter, Ins or even others. You might have to press, press and hold, or press multiple times. The best way to find out the details of that is to look in the users manual or search the manufactures website. A few different Bios screens.

1. A common power-on BIOS screen(notice the 'press DEL for setup' message)


2. A typical BIOS boot menu screen

PC REQUIRES YOU TO HOLD DOWN OR KEY PRESS TO BOOT FROM CD
Some computers require you to hold down or press a key to enable booting from the CD drive, the best place to find this information is in your computers user manual or the manufactures website. Here are some common keys to try if you lack that information.

Apple Computers and others: Hold down the C key while rebooting. Toshiba, IBM and others: press F12 while booting to get to the boot menu and choose CD-ROM. Asus and others: press TAB key while booting and select CD-ROM from boot menu.
CD/DVD DRIVE CAN’T BOOT IN AHCI/RAID MODE
A large number of CD/DVD drives have problems running under AHCI/Raid mode (from not working at all to refusing to boot).
Either plug drive into another SATA port that isn't set to AHCI/Raid or if that can't be done go into BIOS and set mode of SATA ports to IDE/Compatibility mode.

[WARNING: if your Boot drive is plugged into same group of ports it may fail to boot after change(and obviously any Raid arrays will fail also)].
MULTIPLE CD/DVD DRIVES IN YOUR COMPUTER
Some computers will only allow booting from one CD or DVD drive even though you have 2 or more CD/DVD drives. So try the disk in each of the drives while rebooting the computer.
BIOS HAVE NO OPTION OF BOOTING FROM CD/DVD DRIVE
Some manufacturers provide BIOS updates that can correct this issue. For a BIOS update, please check with the manufacturer.
A workaround is available if you can read from your CD-ROM drive, but can not boot from it. You may be able to use the SmartBootManager on a floppy disk to force your computer to boot from the CD-ROM drive.
CD DRIVE UNCAPABLE OF BOOTING A CD (OLDER DRIVES)
Some drives are just too old and do not support booting and will require you to:
1.    Purchase or borrow a newer CD-ROM drive.
2.    Use the SmartBootManager to boot from the CD-ROM drive.
AFTER I SELECT: ‘START OR INSTALL UBUNTU’, IT FAILS TO BOOT
If you have arrived at this prompt, you have successfully booted from the CD. But if you can not get any further, you may want to try some optional bootParameters to get you running.
1.    Press F6 for "Other Options." Try to apply boot parameters:
2.    BootParameters


Posted By Unknown 7/05/2013

Friday, May 31, 2013

Norton Power Eraser


Norton Power Eraser is a free tool that can be downloaded and run to remove threats from your computer. You can run this tool to scan for threats even if you have a Symantec product, or any other security product. If you cannot start the computer in Normal mode, you can run this tool in Safe mode.

Norton Power Eraser is easy to download, and scans your computer quickly to detect the most aggressive computer viruses. You don't need to install this tool.

Norton Power Eraser uses aggressive methods to detect threats, and there is a risk that it can select some legitimate programs for removal. You should carefully review the scan results page before removing files.

DOWNLOAD

2. Save the file to any location

3. Open the file and double-click NPE.exe
     (If the User Account Control shown, click Yes or Continue.

4. Click Accept


RUN A SCAN
1. Open NPE Window, click Scan for Risks

2. By default, NPE performs a Rootkit scan and requires a system restart. When you see a prompt to restart the computer, click Restart.
(If you do not want to include the Rootkit scan, go to Settings, and uncheck the option Include Rootkit scan) (Requires a system restart).

3. Wait until complete

FIXING
1. When Norton Power Eraser completes the scan, it displays the scanr results. The items that Norton Power Eraser considers as risks, display the status as "Bad" and recommended action as "Remove". The items that require further review display the status as "Unknown".

2. Depending on your situation, do one of the following:
    a. If you see "No Risks Found, Norton Power Eraser did not detect any risks on your computer", click OK to exit.
    b. If you see any files listed as "Bad", the Remove check box under Action will be checked automatically. It is recommended to remove these files.
    c. If you see any files listed as "Unknown", for each of these files, click the cloud icon next to it. It sends the file to a Symantec server and scans it using the traditional signature-based detection engines.
    c.1 If the Cloud Scan result shows "Bad" for any file, click the Remove check box.
    c.2 If the Cloud Scan result shows "Not a Known Threat", do not click the Remove check box. The file may not be a threat, and needs further analysis.

3. Make sure that Create System Restore Point before proceeding with fix check box is checked.

4. Click Fix.

5. If you are asked to restart the computer to complete the removal, click Restart. Click Yes to confirm.

6. After successful removal of the risk, in the Removal Results window, click Done.

Posted By Unknown 5/31/2013

Norton Removal Tool

Norton Removal Tool - 20.0.0.21

Norton Removal Tool will uninstalls Norton AntiVirusNorton Internet SecurityNorton 360, and Norton SystemWorks 12.0 from your computer.

If you use ACT! or WinFAX, back up those databases before you proceed.
Norton Removal Tool only compatible with Windows only (XP,Vista,7,8). If you want to uninstall it completely in the other way, you can use this great tool

DOWNLOAD
1. Download Norton Removal Tool. Save it to desktop (or any location).

2. Open the file, double-click the Norton Removal Tool

3. Follow the on-screen Instructions

4. Restart your computer

Posted By Unknown 5/31/2013

Wednesday, May 29, 2013

How to take a sharper photo with smartphone

It must be for smartphone users wanted to get more sharper pictures when they're taking it in beautiful spots, shows, etc... But some of them may had frustrated with some general problems, such as wobbled or blurred photo, even the smartphones with the most powerful camera.


There are some tips for those who have this problem


1. HOLD IT STEADY

A blurred photo, caused by the slow shutter speed plus camera movement. Make sure hands is steady or you can put your smartphone into special holder like mini tripod

2. CLEAN THE LENS

Before taking an object, check your smartphone camera lens. Is it dusty or some traces (usually from fingerprint if you touch it inadvertent. Clean it with a soft rag (or any).

3. GET AN EXACT FOCUS

Some newer smartphones usually equipped with auto focus. But for some older smartphones, you may use your ingenuity and steady hands

4. FIND SOME LIGHT

Dark locations or rooms decrease your photo quality but with flash it may help, which makes the photo too bright or blurry caused by the flash

5. MAKE IT SHARP WITH SOFTWARE (USING COMPUTER)

This is for those who are still unsatisfied with the photo which is not sharp enough. Here are some options for you:
a. Adobe Photoshop CS6
b. NIK Sharpener PRO 3 (Photoshop Plug-In)
c. Adobe Photoshop Lightroom 5
d. Picasa
e. PhotoKit Sharpener PRO 2 (TRIAL)
f. Corel PaintShop PRO

Posted By Unknown 5/29/2013

Monday, May 27, 2013

Add "Disable UAC" or "Enable UAC" to Right-click Menu / Context Menu

This is the simplest example and explanation of the new security model in Windows Vista called UAC. This feature is still included in Windows 7 in which even the Administrator will operate in a reduced privilege login and all you have to do is to confirm.

Actually, UAC is really important for your security, because:
1. All the Rootkits and Worms even the new undetectable ones by Anti-Virus Software can be detected.
2. Modification of System Files by any software vendor (even Microsoft) will be detected.
3. IE 7 uses UAC to run in Protected mode that detects any add-on e.g. Adobe flash before installation and Spyware that wants to modify your system files.
4. Protects your Network from Hackers and Trojan viruses (If not yet compromised).

Some preventions are the really the first thing you really need to do. It can minimize the virus entries, malwares, worms, trojans, and etc.
1. Do not use IE: Use Google Chrome or Firefox instead.
2. Install a Good Anti-Virus with Anti-Spyware/Malware/Rootkit Protection.
3. Use a Lower Privilege user login while browsing the Internet.

But UAC is also a good tool from Windows that should be turned on for prevention. If you want to disable or enable it in easy way, you can put it on the Right-Click Context Menu downloading this BAT file or by using Command Prompt (CMD) (Run as admin) and type this:

C:\Windows\System32\cmd.exe /k %windir%\System32\reg.exe ADD HKLM\SOFTWARE\Microsoft\Windows\CurrentVersion\Policies\System /v EnableLUA /t REG_DWORD /d 0 /f


Now, you can easily Switch it off by adding the command to your context menu. How?

YOU CAN SKIP STEP 2-4 BY DOWNLOADING THIS FILE

1. Download WinBubbles and Go to [WinBubble Directory]\Tools\

2. Create a duplicate of lawrence.vbs and rename it to any filename e.g. DisableEnableUAC.vbs

3. Open it with notepad and modify the 7th line.


4. Use the Following code:


objApp.shellExecute "cmd.exe", " /c %windir%\System32\reg.exe ADD HKLM\SOFTWARE\Microsoft\Windows\CurrentVersion\Policies\System /v EnableLUA /t REG_DWORD /d " & strArg & " /f", , "runas", 1

Now you have a Command-Line vb script program to switch on/off UAC

5. Put the program to your Context Menu

a. Open Winbubbles > Go to Miscellaneous Tab > Decide where do you want to put the Context Menu Item. Example: Desktop Right-Click Menu, Click "Explorer/Desktop" Button > Click the BROWSE Button

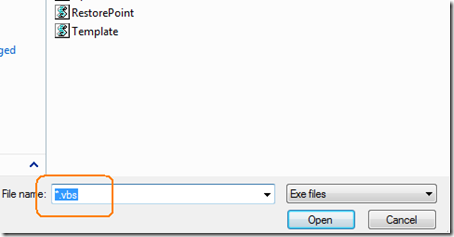
findvbs

b. Go to  the Location of the Vbscript File and type "*.vbs" > Click the File (DisableEnableUAC) and Open Button

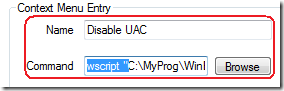
c. Type Any name example: Disable UAC

d. Modify the Command:
To Turn-Off UAC
wscript "[path]" 0
To Restore UAC
wscript "[path]" 1
e.g.
wscript "C:\MyProg\WinBubble\Tools\DisableEnableUAC.vbs" 0

contextmenu

Finally, Click the ADD Button.
Just repeat the steps above for the Next Item.
Note: Please Reboot your Computer after Disabling/Enabling UAC

Posted By Unknown 5/27/2013

 
Claim Free Satoshis Now!